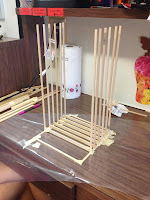
2.
Joists were placed 1 inch apart from each other
to make a total of 9 joists across, 8 inches long each
3.
We cut out vertical wood columns 16 inches long
4.
Vertical wood columns were placed 1 inch apart
and 9 on each side with two columns on the corners
5.
The second floor joists were placed 8 inches
above the first floor in the same direction as the first floor joist
6.
For each piece of wood that we glued, we placed
tape on top of the connection and let it dry over night
7.
We placed plywood inside to show a typical floor
and a typical wall
8.
We cut out and measured sections from the
vertical columns to place the bay window, window, and door
9.
We added lateral supports to the side of the
housing to provide extra support
10.
The roof was made out of four trusses with a
square beam in the center to connect them
11.
The wood that we used for the roof was placed on
top to represent shingles (they were a little bit thicker than the other wood
we had used because of the extra support we need on the roof.
Materials
·
Wood glue
·
Tape for assisting in the setting process of
glue
·
Plywood
·
patterned plywood
·
Vertical wood columns (9 on each side)
What we learned?
·
Just like the house needs support through the
use of joists, the bay window also needs that support
·
We realized that wood is very versatile and
reusable (sustainable) material
·
Designing the home became more laborious than
constructing it because we needed to know exact dimensions and placement of the
·
If we were to make a foundation, the home would
not sink like it had done when we tested it
·
It was challenging to make each wooden column
the EXACT same height because even 0.01 inches off would have affected it


